
Previously, I help you how to install both the Apache server and PHP, this time I’ll teach you how to install MySQL, so we can start coding your very first PHP module. Yep you heard it right, you will be a bonafide kick-ass PHP programmer. Sounds grand?
Ofcourse, I’ll help you how to become one. Yeah, fat chance.
But for now let’s not worry about the programming; our immediate concern is how these three components can communicate with each other.
So it is very important that we install it right and accordingly. Now, it’s time to install MySQL.
- Download the latest version of MySQL
Download the latest version of MySQL from here. Notice that by clicking the link you will be redirected to the download page with several versions of download, now it is best and safe to select the 32-bit MSI, if you are using Win XP or Vista and this time we will be downloading the Installer version unlike in our previous two (Apache, PHP) that we opted for the manual installations. Now select for the Windows (x86, 32-bit), MSI Installer, you will be asked if you are a returning user or a new one. Obviously if you are a new one you have to register first, after registering you will then brought to a mirror page wherein you can select different mirror sites, it’s up to you to choose one. Now, your downloaded file should be named like this, mysql-essential-5.1.50-win32.msi. - Install MySQL v5.1
Run the MSI file and use the following settings- Typical Setup
- Skip Sign-Up
- make sure "Configure the MySQL Server now" is checked
- "Detailed Configuration"
- "Developer Machine"
- "Multifunctional Database"
- "InnoDB Tablespace Settings" - leave everything default
- "Decision Support (DSS)/OLAP"
- make sure "Enable TCP/IP Networking" is checked and leave the port number at 3306 (at this point, if you have a firewall, it will usually try to access itself on the localhost). Leave "Enable Strict Mode" checked
- "Standard Character Set"
- check "Install As Windows Service" and I would recommend leaving "Launch the MySQL Server automatically" checked.
- enter a root password (and remember/write it down) and I would recommend leaving "Enable root access from remote machines" unchecked
- then hit "execute" and it'll install and set it up.
- Getting PHP5 to work with MySQL
And because in PHP5 version the built-in support for MySQL was removed, so we have to manually set the configuration. From your C:\PHP folder copy libmysql.dll and copy it to c:\Windows\system32 folder. Now go back to your PHP.INI and enable mysql extension, you can do this by searching ;extension=php_mysql.dll and remove the semicolon (;) appears before that line. Now restart Apache and see if you get any errors. If it complains about “php_mysql.dll” either you PHP extension directory isn’t correct or windows can’t find libmysql.dll. - Testing MySQL
To test if your MySQL is running, you have to construct a PHP program that would ask if your MySQL is connected. Here’s the code to that, let say you have named it to mySQLtest.php.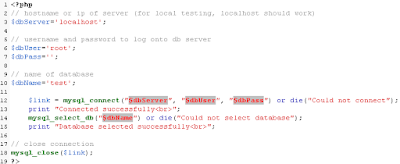
Now test that code on your browser by typing http://localhost/mySQLtest.php. Your browser should give you this result.


When I first read this web page my conclusion was that Mga Kwentong Alamat's regulars should view this: http://hubpages.com/hub/rent-a-laptop-rentals . I can't understand renting a netbook at all! The bucks for renting a notebook for even about ten days is going to set you back as much as basically going to the store and buying the unit!
ReplyDeleteGood Afternoon
ReplyDeleteThanks for writing this blog, loved reading it
Wow all I can say is that you are a great writer! Where can I contact you if I want to hire you?
ReplyDeletehow are you?
ReplyDeleteThanks for sharing, I have digged this post